Wednesday, October 15, 2014

Commercial: Virgin Airlines

I recently shot a spec commercial that was picked up by Virgin Airlines.   It was shot on RED EPIC with super speed MKII lenses.  I was excited about shooting this piece because it involved shooting inside an airplane.  I knew the biggest challenge would be space constraints as the plane interior that we shot in was to scale.   I watched a bunch of movies that had scenes that took place inside an airplane to gather some lighting ideas.   One challenge with our particular plane was that due to time constraints we could not remove the roof, which was only about 6" above the talent's heads.   I had some experience working with VHO PRO LED LiteRibbon before and I loved how low profile they were while still having a fairly strong output.   I ran two strips of LiteRibbon down the length of the isle's ceiling, one on each side so that it created an even top light all the way through.   You can dial in the brightness as well as the Kelvin on the LiteRibbon so it's very controllable.

We gelled the windows on both sides of the plane with 216 and punched 1.2 HMI's through both sides.  This helped raise the ambience inside the plane and mixed with the top light from the LiteRibbon so that the source felt more even rather than all the light originating from above.   This filled in the talent's eyes/faces nicely.   The HMI's also created a nice back/edge light for all the passengers.  I shot around a F2.0 with the super speeds which I've found is a great stop on those lenses.   Once you start opening wider than that the image becomes too soft in my opinion.  At a F2.0, it just starts to feel a bit softer and milk slightly as opposed to being closed down more.  I think an F2.0 is a nice happy medium for super speeds, not too soft/milky but just a touch.  The highlights also bloom nicely which looked great on the 216 gels over the windows.   It was also nice that the HMI's played a bit cooler than the existing practicals in the plane as it created depth with a variance in color temperature.  Setting the EPIC at 5600 white balance, I dialed the Lite Ribbon in to a bit warmer than 5600k so that the faces read slightly warm but closer to white while the background elements that were lit from existing practicals read warmer on camera.

A 4' slider ended up working out great to add some movement to shots without being too cumbersome due to space constraints.  One of my favorite shots in the piece is the opening shot that slides forward down the isle, it's on a wide lens (18mm) and has a lot of depth, symmetry and interesting lines with the curvature of the airplane (TOP LEFT)  We did have to remove some of the seating on one side in order to get slider shots of passengers etc.   Overall I think the spot turned out great, it was exciting that Virgin liked it enough to pick it up, which rarely happens with specs.   I'm glad I chose to go with the LiteRibbon, really amazing tool that I will definitely be using again.

Saturday, April 5, 2014

Commercial: DJI Phantom


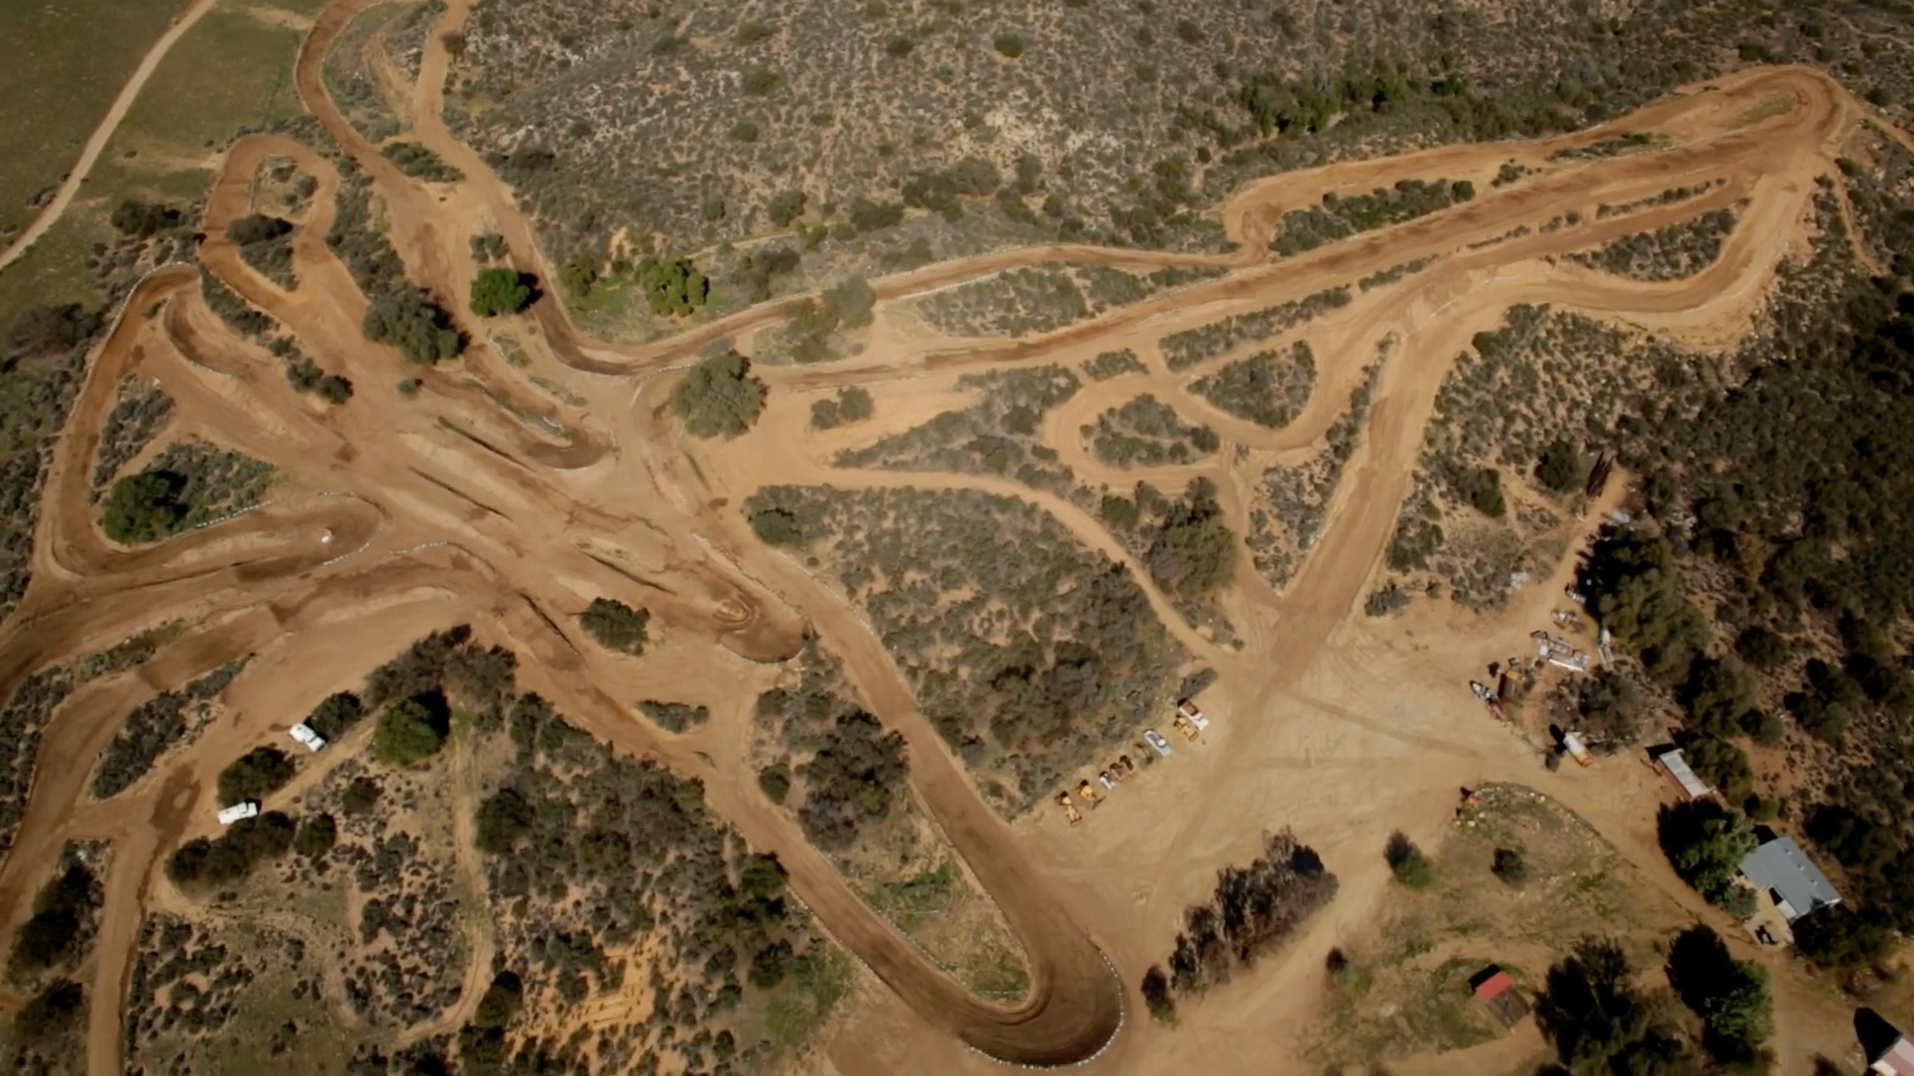
Recently I worked as a camera operator on a commercial for the company DJI.  The purpose of the commercial was to showcase the unique angles and perspectives the DJI Phantom Drone can capture.  We shot on 2 RED EPICs from the ground while 7 Phantom Drones covered the action from the air. My main focus as an operator from the ground was to capture both the motocross rider and the Drone in the same frame as much as possible.  This was to connects the "product" to the action throughout as well as showcase the drones ability to keep up with the subject.

Before shooting the piece myself and fellow DP Matt Roe researched various motocross videos to see what angles would be most dynamic and what angles to avoid.  Some of the footage that looked the best was shot on wide angle lenses very close to the action.  This proved to be difficult to get while remaining safe, but I think we shot some really amazing footage.  I was positioned on a slider most of the day, and I often shot on a wide lens right from the dirt.  Being this close to the ground helped make the slider move read because the dirt served as a nice foreground element.  A key concept that was introduced on set by Matt while shooting was, "In order to shoot motocross well, don't shoot motocross."  In short, compose interesting and unique frames without focusing on the rider, and then let the rider enter these frames and become part of them.  Shooting with that concept in mind really helped the piece as a whole.

We also shot an interview with the rider in order to get his perspective on the drones ability to follow the action.  We used an 800w joker and some neg fill for the interview.  In order to bring the most out of the skies we made sure to dial in the polas as much as possible.  It was a long day of scrambling through the dirt and hoping on and off gators with heavy gear but watching the finished product made it all worth it.  I think the music and the sound design helped further differentiate the piece from other motocross videos.  Director/Editor Don Broida did an amazing job putting this one together.  If flows well and really pushes the product in a way that doesn't feel forced while keeping the piece exciting and up beat.

Thursday, November 21, 2013

Music Video: Floodgates


I recently DP'd a music video for a song called "Floodgates" by the artist Bakes.  The concept, developed by director Jason Perlman, involved a narrative in which a deranged doctor kills 3 young women and subsequently combines pieces of their bodies to reconstruct a frankenstein like creature.  Most of the video is revealed to the audience through VHS tapes played back on the TV sets of the victim's parents.  We put the pieces of the story together alongside them as they witness the horrific acts of "the doctor" for the first time.  We shot the majority of the video on RED EPIC with  zeiss superspeed primes.  One of my favorite shots was of a father of one of the victims watching a VHS tape play back on his TV. (LEFT)  The room that we shot in had a bathroom door with this really amazing patterned glass.  I knew when I saw it that we had to incorporate that into our frame.  We ended up positioning the father very close to the TV set so that his key would actually come from the blue light emitted from the television.  We then put a 4x4 kino with tungsten bulbs just out of frame punching hard through the patterned glass and shot the subject profile with this illuminated glass in the background.   The kino was a perfect fixture to fill the glass completely and it really created an awesome background texture.  We also clamped a tweenie to the top of the glass door to create a hard rim/edge light around the subject which helped create some separation.  I balanced at 3200K so that the background lights would read white in contrast to the blue key coming from the TV screen.

For the performance shots, we rigged 19 degree lekos on speed rail high above the set and hit the talent hard from a distance.   We also hung 4 foot industrial fluorescent fixtures vertically from the ceiling and put them on variac dimmers in order to create a green fluorescent flicker effect.  We bounced some fresnels into moving mylar gels in order to make the light dance on the background walls for a kind of water effect.    For the tight performance shots we were on a jib and I could use the vertical flickering fluorescent as a nice foreground element to come off of.  (ABOVE LEFT)  We also created an awesome "operating room" set complete with torture tools/defibrillator etc. (BELOW LEFT)  The set looked so amazing I tried to shoot it as wide as possible looking straight down from the jib.  I top lit everything here with spotted fresnels to create patches of light on certain elements.  I didn't want to use broader sources in fear of washing out the small space.

There were other POV shots and cut ins that were shot later that really added to the story as well.  Looking back on the shoot and watching the final product now really puts into perspective how complex of concept this really was.  There are so many different elements/locations and characters that you really have to focus in order to follow the story that is woven throughout.  It all comes full circle in the end and it is really interesting to be there with the parents of the victims as they realize what has happened to their children.  The edit was really well cut and it keeps the viewer on his toes throughout the piece.  Jason Perlman is meticulous as always and as with many of our past collaborations I'm pleased with the result.

Thursday, August 15, 2013

ESPN Piece: "Redefining Strength"


I was recently hired by ESPN to shoot a piece for SportsCenter called "Redefining Strength."  The piece focused on Jon Feinman, who founded a program called Innercity Weightlifting.  The program was designed to help guys get off the streets and present them with a positive opportunity to potentially turn their lives around.  Feinman's gym gives men of the streets hope that there may be a way out. "Redefining Weight" was an 8 day shoot with only a few days of prep.  We rented both the camera and the lighting/grip packages from Rule/Boston Camera in the city.   I used to intern there when I graduated college so it was really awesome to return and see some of the same people that I used to work with.  In terms of the shooting locations, I was able to see a few of them prior to rolling but because of the run and gun nature of this doc style shoot, most of the locations were still TBD.  I knew the piece would consist of interviews with Jon and a few of the key members of the gym as well as B-roll of the city and the gang terretories surrounding the complex.   Obviously a lot of our shooting time took place in the gym as well.

We rented an Arri Alexa package with Zeiss Superspeed primes for this gig.  I originally wanted to go with the Fujinon Cabrio 19-90 zoom as it would have suited the run and gun nature of the piece, but it was unavailable at the house we rented from.  The Superspeed kit ended up working out very well other than the fact that we had to stop for lens changes which can sometimes interrupt the flow while events are unfolding.  I loved how easily the superspeeds would flare and in so many varying ways depending on the angle/quality of light that was hitting the lens.  Sometimes it would be a hard flare with a complete white wash and/or circle pattern and other times the image would just have a subtle milky look.   The gym had a huge bank of windows on two sides that created a nice diffused ambience in the room.   I rarely ever shot facing away from the windows as they looked great as a background element against the darker tones of the gym and the people that lived in the space.  I used a mix of 1/4 and 1/2 pro mist depending on the subject matter and the elements in each frame to give a subtle bloom to the highlights for some shots. The pro mists also helps smooth out the skin tones a bit.

For the interview setups, we keyed mostly with an 800w Joker or used the diffused window light as a key and used the Joker as a way to fill in or wrap the key further around the face.   The director was not a fan of backlight so we went without an artificial edge/backlight source.  Sometimes the natural sunlight would bounce off the ground and create a subtle edge on the subjects face which we let fly.  We also used negative fill as a way to create contrast if we needed it.  In terms of the b-roll, we wanted all the shots of the actual city of Boston to feel pristine and beautiful so that they would contrast nicely with the rough feel of the the streets of Dorchester etc.  Almost everything we shot of the city was on a slider or jib to give that footage a clean/smooth look.   To contrast that, everything we shot in the streets of Dorchester was hand held and much more real/gritty.  Ninety percent of the gritty b-roll was shot out of our production van while driving around in gang territory.   It made for some close calls at points, but getting the footage was worth it.  The blue and red flashing lights of the various cop cars around town flared the lenses beautifully and a lot of that footage made the final cut.


This shoot reminded me again that as a DP, the sun is your best friend.   The sun can make or break a doc. shoot like this where you don't have a ton of tools to emulate a certain angle or quality of light.  It's direction and location were so important during this shoot as we wanted to capture sun rise and sunset at specific locations on certain days.  One of my favorite set ups involved a sequence in which a silhouetted, nondescript subject lifts a heavy weight bar symbolically over his head (LEFT). We had to wake up before sunrise to get the correct angle and quality of light entering the window for the shot to work correctly.  Shafts of light punched hard through the windows creating long shadows on the floor.  We smoked up the gym to give the light some shape and added a few other fixtures for specials and we were ready to rock.  I was very happy with the way that sequence looked.   For exterior b-roll shots, we did our best to track the sun but it somehow always seemed that we were chasing it.   Somedays we shot from sunrise to sunset through some of the longest days of the year.  We would drive around Boston and search for elements in the city that would be relevant to our story/message and then hop out of the van and shoot it.  Using the Artemis Directors Viewfinder App on my IPHONE really saved the day on this shoot.  I could hop out of the van and chose a focal length, lens height and angle without taking any of the gear out of the car.   That way we didn't waste time moving the camera once it was out of the van.

Overall, it was a great shoot and I was glad to have the opportunity to work back in my hometown area of Boston.  I was lucky to have fellow east coaster Austin Ahlborg on board as my AC who flew out from LA as well.  Sourcing crew and gear in the Boston area was a bit of a challenge, but it definitely put into perspective how lucky we are here in LA to have access to so many rental houses etc.  It's always tough watching the final twelve minute piece knowing how long we shot and how much footage ended up on the cutting room floor, but I think the shots that did make it in the cut where the right ones.  It was really great getting to see my work on national television on a network I grew up watching.  This piece has been getting some good feedback thus far so hopefully this is just the beginning of my collaboration with ESPN.

Here's the link to the final piece.  Enjoy!

http://www.youtube.com/watch?v=FEtI6QCmS-4

Sunday, July 7, 2013

Music Video: Rocket Ship

Recently I shot a music video for a song called "Rocketship."  When the artist was young, 6 of his friends committed suicide and this song was written in memory of those individuals.  The concept for the video involved finding families who had been affected by suicide in the local Los Angeles area.  The video would be a way for them to commemorate the ones they had lost to suicide.  It was an extremely emotional shoot as you would expect, but it made for some intensely powerful images.  The shooting process was definitely a challenging one as we wanted to capture the real raw emotions that these people had for their loved ones, but to get those emotions to come to the surface we needed to spend time and connect with them in order for them to feel comfortable enough to share their stories with us. The shooting process involved us visiting each individual at their house and then choosing a location within that house to shoot that would suit the mood of the piece and make for a powerful image.  It felt a bit like shooting an interview set up because we wanted to put the talent in a position where they could tell the story of their loved one to the artist who was just off camera and when they reached a point where they became emotional, we would start rolling the cameras and direct that individual from that point.  It was definitely a very tough thing to do to make these people pause in the middle of recalling such intense events in their lives, but it was worth it to capture the raw emotions that could only be brought out in this way.


I partnered with fellow DP Matt Roe on this project and we shot with two cameras, one with a wide lens on a slider at 24fps and another on a tight lens at 60fps.  I think this worked out really well and gave the editor plenty of options.  In terms of lighting, we wanted to go with hard sources, which I think worked really well for this piece.  It was definitely cool to break away from the soft source techniques that are so often used.  What's fun about music videos is that you can experiment with different lighting techniques and color contrast without having to justify it in a way that you would with a narrative piece.  Light doesn't necessarily need to be motivated or feel natural, with this piece we could make the shots feel as stylized as we wanted without worrying about remaining consistent or having it feel too created.  We tried to do something different with the light for every set up, whether it be with color contrast or key direction etc.  I think one of my favorite set ups was when we shot in a bed room and we covered the key light with a deep cyan gel. (ABOVE LEFT)  The cyan tone as well as a cooler white balance setting really gave the subjects face an eerily beautiful look.  We had a source 4 coming in hard through a window in the background that put a slash of warm light on the bed/pillow as well as edged the subjects face hard from the left.  I think the combination of the cyan key and the warm back edge really made for a great color combination.

Another set up that I really liked was with two subjects (mom and daughter) outside in a patio area. (ABOVE LEFT) We had been experimenting with using tungsten sources in a daylight environment prior to this shoot and this was a good one to implement that kind of technique.  I really liked having the subjects look warm in an otherwise cool environment.  It really made them pop and your eyes are immediately drawn to the center of the frame.  The soft edges helps with that as well obviously.  We used Vaseline on the lens for almost every wide shot.  I loved this technique as you could literally throw any item in the frame into hazy soft focus with a dab of your finger.  You could also swirl it around to make interesting patterns within the architecture of the existing frame.  Using all of these techniques combined really made for some unique and original shot compositions.

You can see the full video here: http://www.youtube.com/watch?v=lO6fxLshdls

Wednesday, March 20, 2013

Shooting in Mexico

Through most of February into March I traveled to Mexico on a 20 day shoot for the U.S Soccer Federation.   I've been shooting for them for over 2 years now and most of the trips require the same kind of shooting routine.  I'm dealing with mostly natural light in terms of interview set ups and it's really just about placing the subject in a place where they are back lit and then exposing properly for the skin tones.  In post I can tone down the highlights and push up the mids to smooth things out but I've found that when shooting in an uncontrolled environment, back lighting the subject always looks the best.   I brought along my GoPro Hero 3 on this trip and it allowed me some time to experiment/play.  We had members of the Mexican police force escort us to and from games and practice every day so I was able to get some really interesting/dynamic angles by attaching my GoPro to the back of their motorcycles/vehicles (ABOVE LEFT).  I was able to control the camera via the wireless remote from the team bus.  I got some pretty unique shots as the police officers swerved in and out of traffic on the cobblestone streets. 

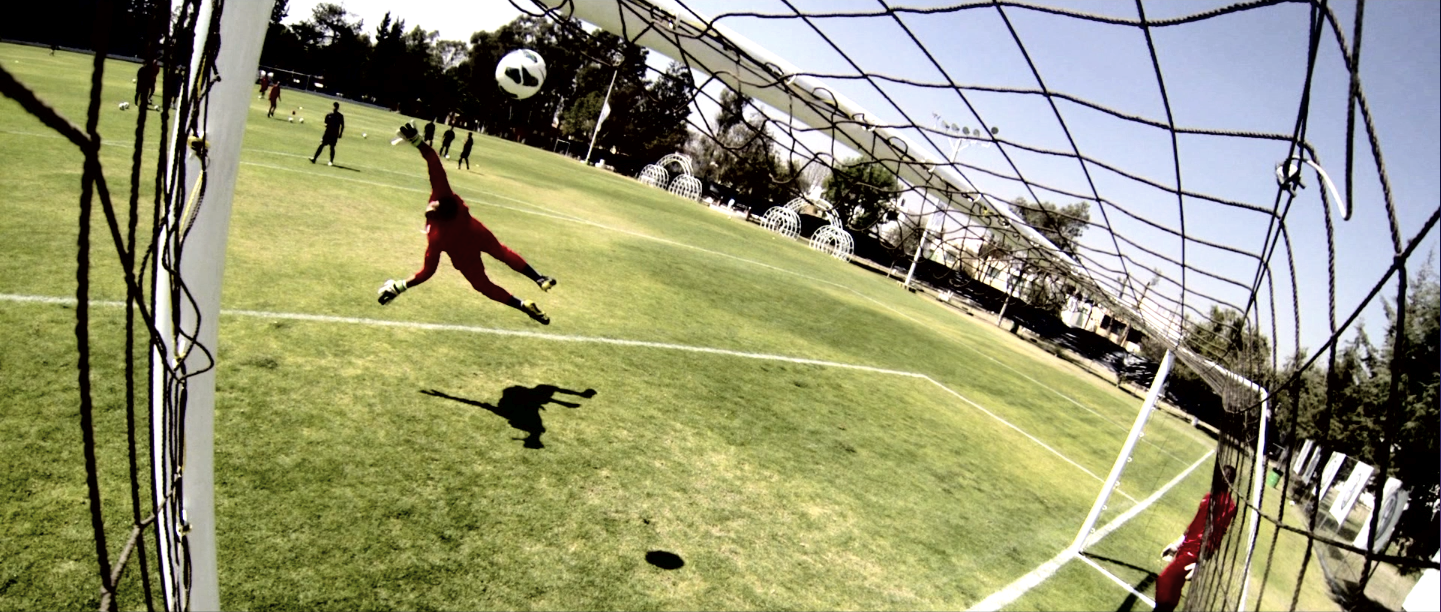
At training, I was able to get some really cool angles with the GoPro by attaching it to the bottom of one of the extra training poles that the players use to run in and out of during warm ups.  I was able to run along side players with the camera less than an inch off the ground and follow them through drills etc.  I got some really cool shots where I would spin the camera 360 degrees around a player from an extremely low angle (ABOVE LEFT).  I liked this a lot because the low angle and the wide lens really gave the players a "heroic" sort of feel.   Lens flares also add a lot to GoPro footage and after reviewing the footage I actually preferred the angles that were shot directly into the sun as apposed to away from it.  Having such a small, shockproof little camera on a pole really allows you to get unique angles and movements that you couldn't otherwise.  I taped the camera high inside the goal and got some cool perspectives on goalie's diving and balls hitting the back of the net (BELOW LEFT).  It was really interesting cutting together a highlight with a mix of GoPro footage and footage from the Sony ENG cam I was shooting with because after a while I was throwing out more and more ENG footage because it just seems so conventional. The GoPro footage always had more movement in terms of the operating and the shots were all much more dynamic and eye catching.  The super wide angle lens also makes for a distorted perspective of elements that come close to the camera like cleats or the soccer ball in my case.   Having the camera low to the ground on the end of the pole works really well for soccer because that's where all the action is.  Everything is about footwork and ball control and having that angle really puts you right there in the action. 

The camera always feel like an extension of my own body when I'm shooting, but I feel a lot less restricted and confined when it's a GoPro pole rig.  I feel much more free to experiment and just let my instincts take over when operating without having to worry about an expensive heavy cinema camera etc.   However,  I know the image isn't nearly as good and it took a lot of grading to get the GoPro footage to look acceptable.   It obviously just doesn't have a good dynamic range and sometimes the highlights go green a bit which is odd but for the piece I put together I just CC'd the footage to make it look super dirty and contrasty, letting the highlights go nuclear and crushing the blacks way below 0 IRE.  You can see from the stills that I went for a gritty, desaturated look and I think the team liked it.  Working with the GoPro so much really gave me a renewed appreciation for dynamic camera movement and how important hand held operating is to the look and feel of certain pieces.  I think a lot of good cinematography is about finding perspective and angles that are unique and appropriate to the subject matter or the message/feeling that a particular piece or scene is trying to convey.   Mexico was a fun shoot and I learned some pretty valuable lessons from just messing around with my GoPro.  Hopefully I can take these lessons and apply them to the next narrative piece I work on.

Thursday, January 31, 2013

Beauty Lighting & A Lesson In Color

Throughout the months of December and January I worked as a DP for a company called Onyx.  I was responsible for shooting numerous video tutorials about various hair and make up styles as well as "get to know me" videos for different stylists and models.  I had done some beauty lighting in the past for a few promos but this was really my first big gig that I knew would want that soft, shadowless beauty look.  I lit mostly with Kino's through unbleached muslin.  I ended up putting the lights as close as I possibly could to the lens so that the source was as frontal as it could be, creating  little to no fall off.   Muslin really helps spread the light and give it that even, sourceless look.

One of the biggest challenges on this shoot was managing the location.  We shot in a bathroom that was pretty much a hall of mirrors.  It seemed like everywhere we put a camera or a lighting fixture, it could be seen in the reflection of a reflection of a reflection somewhere.  What really ended up saving us was that the tile in the bathroom was almost exactly the same color as unbleached muslin so we were able to cover some of the mirrors that were not in frame with that in order to eliminate some of the double reflections.  The reflections in the mirrors that we kept uncovered really added some depth to the frame. (ABOVE)  The A cam was a 5D MKII which I kept mostly at a 2.8-4.0 split.  The shallow depth of field really helped hide the fact that some of the background reflection was not actually tile, but unbleached muslin.  The B-cam, used for close ups was a Sony EX1.  We used an SFX1 filter on this cam to help soften the EX's sharper image and we were almost always on the tight end of the lens to help match the shallow depth of field of the 5D.  I also tweaked the picture profile settings to lift the blacks and create more of a low con image in camera.  It's a bit tough to match the two cameras as they have different sensors, lens characteristics etc. but we did the best we could in camera and the rest was tweaked in post.  Moving forward we will be shooting on two of the same cameras but because of the budget and last minute nature of this gig, I pooled the resources I had available and we made it work with two different cameras.

I learned a pretty big lesson on this shoot involving color.  We were shooting in the home of one of the stylists and we lit the scene very much the same way we had been lighting every other video but for some reason I wasn't liking the image.  I kept looking at it and wondering what was wrong.  It was lit well, no shadows, proper exposure, shallow depth of field etc.  I put the thought out of my mind and continued on to the next set up.  The next set up involved exactly the same actors doing basically the same action, but just in a different setting.  I lit it the same way and when we were ready to roll I looked at the image and thought, this looks great.  I stopped for a second to think about why this image looked so much better than the last.   I realized that the difference was in the color palette/tone.  The first set up had a beautiful stone fireplace with a wood mantel in the background.  The talent was African American women wearing jeans and a shirt of a darker tone.  It seems so obvious now what the problem was but at the time I didn't realize it.  I just saw a beautiful stone fireplace and wood mantel with great texture and thought, that will be a perfect backdrop.  There was no color contrast in the image at all.  Although the textures were great, everything in the frame was dark brown or black. The colors in the frame also did not portray the right message. We were trying to go for a bright, upbeat, happy tone with these pieces and none of the colors were reflecting that tone.  Although it was lit properly and exposed correctly, the colors in the frame were just all of varying darker tones.  The image still looked good, but it was that subtle difference in color tone/pallet that was the reason why I wasn't liking it as much as the second set up.   The second set up had a white background with some bright green vegetation that could be seen through some open windows in the background and the talent was wearing a bright pink shirt. (ABOVE LEFT)  It seems so obvious now but all those colors created a much more upbeat, bright feeling frame than the previous.  The white background also created separation through color contrast as the talent had a darker skin tone.   A subtle difference in wardrobe choice or set decoration can make a huge difference in the quality of your overall image.  The color of each item in the frame and it's relationship to the color of other items can be the difference between something that looks good, and something that looks great.  I'm really glad I was able to take this simple but immensely important  lesson away from this job.  I will take this with me and remember it always as I continue on my journey as a DP in this industry.   

Sunday, November 18, 2012

Documentary: "Royalty Etc"

A few months ago I traveled to Minneapolis to start DPing a documentary called Royalty Etc.  The documentary follows the lives of two guys (Ty and Jon) as they grow up around the music scene in Minneapolis and eventually form a record label known as Royalty Etc.  There is a pretty amazing series of events that leads to the eventual formation of the label, which makes this story a great one to document.  It is still early in terms of shooting and the whole story has yet to unfold but I'm excited to see what comes next.   I'm shooting on an Sony EX3, which I like better than it's predecessor, the EX1 that I shot my first two doc. features on.  The image quality is the same but the changes that were made ergonomically really help.   I'm a fan of the eye piece/flip LCD and the built in "shoulder mount" that were added.   The shooting I have done so far has consisted of a bunch of sit down interviews as well as various b-roll around Minneapolis.  For exterior interviews I used as much of the fall foliage as I could as it looked great as a backdrop.  The story has a loose and relaxed feel so I opted to not lock the camera off completely for interviews.  I paned and tilted the camera slightly while riding the zoom a bit as if I was constantly searching for a frame.  I liked this look for talking heads, it's something I've never done before and I think it makes them feel a lot less rigid.

It was cloudy most of the time while shooting exterior interviews which was a negative and a positive in terms of image quality.  It was good as I didn't have to worry about trying to control highlights while maintaining proper exposure on the faces but at the same time the image always looks a bit flat when there is no sun.  I would rather have a slightly flatter image than an image with uncontrolled highlights so in the end I was happy with the way the exterior interview footage came out.  For interiors I had (2) 2' 4 bank kinos to work with.  It was nice to a have a fixture with both daylight/tungsten capabilities as I was in a lot of situations where I was dealing with existing daylight spill from windows etc.  One of my favorite set ups was an interview we shot in a basement (ABOVE LEFT).  The subject matter was pretty dark so I wanted the lighting to reflect this for that particular interview.  There was a bit of daylight spill coming in through a basement window in the background which looked nice but it was too much so I stopped down a bit and then keyed pretty sidey for a more contrasty look. I think this lighting set up really draws your eye into the subject's face without drawing attention to anything else in the background.   I mixed up the key angle and intensity for other interviews depending on how I wanted them to feel.  It's been a great shooting experience so far and I'm looking forward to seeing how the story unfolds as we continue to put the pieces together. 

Wednesday, September 19, 2012

Shooting In Japan

 I recently returned from a 30 day shoot in Japan for the U.S. Soccer Federation.   I have worked as a freelancer for them for a few years now and it has been a great opportunity to travel and shoot in places all over the world.   I shoot training session/games and interviews with players/coaches and any excursions the team may go on during off days.   On this trip I shot at the Hiroshima Memorial, the U.S Ambassador's residence and the Tsunami disaster zone in Sendai.   These were pretty eye opening experiences and it was great to be able to capture the teams reaction as they visited each site.  It's interesting to go back to the world of ENG style shooting when I'm with the U.S Soccer Federation as so much of what I normally shoot and work on in LA is with cinema camera systems.  I shoot on the Panasonic HPX250, which is cool because I can see how far Panasonic has come with this line as the very first HD camera I used back in 2004 was the HVX200.  They have way more inputs/outputs now, including HDMI and firewire 400 which I use for live capture.  It also has a waveform monitor built in and it's a lot easier/quicker to shoot variable frame rates.  The HPX250 also shoots in AVCINTRA which is a relatively new codec for Panasonic and it's been fun figuring out that post workflow.  

The other thing that's interesting about returning to the world of ENG style shooting is having to deal with harsh lighting conditions with no grip/electric equipment to shape/control light.  It's always important to chose the best location to place your subject based on the direction of the sun, but it makes it even more important when you have no way to control it or add any additional sources.  I found that the best thing to do for shooting interviews in harsh sunlight during mid day is to place the subject so that the sun is at their back, creating a hard edge on their shoulders and hair.  This way the sun is not creating harsh shadows under the eyes and the subject is not squinting into the sun during the course of the interview.  It's tough to control highlights with these cameras but I found that if you have to, you can let the back edge light blow out a bit in order to get proper exposure on the face and then with a little color correction you can bring the highlights down and push the mids up a bit.  This actually softens or "smooths" out the image and I found that it looks good when shooting women.  It definitely takes away some contrast when you do this, but if you bring the blacks down a bit after it helps add more.  Another challenge was that because in Japan the frequency of electric current is 50 hertz as opposed to 60 hertz like in the U.S, I could not shoot at a 1/60th shutter or else the lights would flicker really bad.  I chose to shoot at 1/100th as that was the best option that would put the shutter in sync with the 50 hrtz frequency.  It was a little annoying because then I needed to push the gain to compensate for the light loss with a sharper shutter but better that than giant strobing lines across the frame.  

Overall it was a solid trip and an exciting one as the team took home the gold medal.  It was fun to be a part of that and to be able to document their journey from beginning to end.


Monday, August 20, 2012

Short: "Snag"

Recently I shot a short called "Snag." It was a 4 day shoot that took place primarily in Hermosa Beach.  We shot on EPIC, which was really nice, especially after coming off a feature shot on 5D.  It was amazing to look at the waveform and not see it completely stretched on every shot.  I got so used to how the waveform looked when shooting with a 5D that I forgot what it was like to shoot with a camera that has some real dynamic range.  I remember one shot where we were shooting 3 subjects who were back lit by the setting sun with the ocean way off in the distance.  I looked at the image and thought there was no way we were going to retain the detail in the sky/water while still getting proper exposure on the faces.  All we brought in was an 8x8 ultra bounce and we were able to get good exposure on the faces while still retaining detail in the water/sky.  I looked at the waveform and there was nothing clipping at all, which was amazing.  There was no way that would have happened on a DSLR.  One of the main shooting locations was a laundry mat in Hermosa (ABOVE LEFT).  The scenes in the laundry mat had a ton of characters involved and blocking was heavy.  Lighting was a bit of a challenge as the entire place was lit with florescents that we were unable to switch out due to time constraints so we shut them off completely.  Although, there was a decent amount of natural daylight coming in on one side as it was completely glass.  This helped bring up the ambient level at least on one side.  For the few wide shots we had, we pretty much lined the opposing side of the laundry mat with Kinos to bring up the fill side and for tighter shots we tented various sections of the windows to create contrast and shape/control the natural light coming in while supplementing with Kinos for back-lights and fill.

One of the shooting locations that I thought came out really well was an awesome top floor apartment building overlooking the ocean.  On the scout I was really concerned about the high contrast and being able to retain the detail of the ocean out the windows while getting enough exposure on the talent inside.  We ended up gelling the windows with ND9 and then keying with kinos through light grid.  Everything looked great, you could see the beach and the ocean through the windows and we had nice exposure on the talent as well.  This was another scene I was really glad we had the EPIC for as its dynamic range really helped out.  We also shot a really cool bike chase scene from the back of a van and were able to catch some great sunset shots down at the beach.  Overall it was an ambitious shoot with a tough shooting schedule but it felt good that my regular crew was cool enough to come on board and make this happen with me.  As always, I'm excited for the next one.

Thursday, May 24, 2012

Feature: "15 North"

Through the month of April into May I shot a feature called "A Way Around." The last feature I shot was a documentary, so I was pretty excited at the opportunity to once again return to the world of long form narrative. "A way Around" is a road trip movie that chronicles two characters as they travel from LA to Salt Lake City, Utah. The Cannon 5D, being the workhorse of the low budget indie wold, was the directors camera of choice and there was very little wiggle room in the budget for me to suggest otherwise.  I have had mixed feeling about DSLRs from the beginning of their rise around 2009 but I figured this was a good project for me to finally take the plunge and see what the 5D was capable (and not capable) of doing. My friend and fellow D.P Matt Roe had shot a feature previously on the 5D and was a solid resource as I prepped for this one.  I had shot small pieces on DSLRs in the past and was familiar with the 5D but it was still a bit nerve racking to dive right into shooting a feature on one. I knew the limited dynamic range would be one of the biggest issues I would be dealing with so choosing the right picture profile was really important. The good thing about jumping into the world of DSLRs late is that there are a TON of articles/screen tests/comparisons online that millions of other film makers have posted in regards to DSLR film techniques.  Matt had suggested using "Marvels" profile as that was what he used on his 5D feature. I looked at technicolor's profiles as well as "Flaat"and a few others but settled with "Marvels" as it seemed to be a good happy medium. Matt had warned me and I had also read to stay away from overly flat profiles because banding can occur when stretching the waveform while coloring, resulting in loss of information.  "Marvels" lifted the black values slightly without creating an overly flat image. I also used "highlight tone priority" on wide day exterior shots and select shots that I could not control all of the highlights properly. This setting helped retain more information in the highlights without significantly altering the mid tones. It worked well, but I used it sparingly in case it was degrading the image quality at some level.

I knew the other big issue with shooting 5D would be focus. Due to budget constraints, I had very little say as to lens choices and I knew it would be a disaster to pull focus on still lenses no matter what, but it would be even more of a disaster if we didn't choose stops wisely. Again, I spoke with Matt and did some research online and decided that whenever possible, I wouldn't open up the aperture wider than a 4.0.  I also hate the nauseatingly shallow depth of field that has become the trademark of so many indie DSLR shoots. I feel like depth of field is an artistic choice that can help tell the story or draw your attention to different aspects of a frame in varying ways. It seems like so many people out there just think the shallower the better and that seems like such a closed minded way of thinking about it. What's the point of having amazing locations if everything in that location is soft? You can't really create a great composition if the only element in focus is the talent (or 2 inches of the talent at times). AC Mark Rosen was up for the challenge of 1sting on this show, and he did an amazing job.  The B camera almost always wore the 24-105 zoom which we used mainly at the 50 and 85mm focal lengths to match A camera for dueling OTS's.   We shot all the day exteriors around a 4.0-5.6 but it proved to be quite a challenge to light night interiors and even day interiors to a 4.0 with the limited lighting/grip package we had. There were times where we were forced to shoot at a 2.8 due to the complexity of a shot or just the sheer amount of area that would be seen in a wide. I did however notice that with shot compositions that did not include a lot of depth (like two people sitting in bed 6" away from a wall) it made a huge difference to open up to a 2.8 rather than to stay at a 4.0.  Many people had said it was okay to push ISO on the 5D but I had seen some footage shot at ISO 800 and it didn't look so great. I never raised the ISO over 640 on this show.

We used our 1 ton lighting/grip package on "A Way Around".  On the lighting side, it basically included a bunch of Fresnels up to 2k, a few parcans, Lekos and some assorted Kinos. We really pulled off a pretty good looking film with an insanely small amount of lighting/grip gear. Jeff Marlowe came on board as gaffer on the show and he did a great job. We were really understaffed and "undergeared" and to pull off some of the shots that we did was pretty awesome. One of the biggest challenges of this feature was that director Aaron Fradkin wanted to double cover every scene due to the improvisational nature of the script. This made it extremely difficult to light as we had to light both sides of a conversation at the same time, meaning that almost no fixtures could be placed on the ground unless they were far enough away from the talent so that neither camera would pick them up. When we had the space, we keyed with a 2k Fresnel through 6x6 light grid so that the key could spread and reach both subjects at the same time. The problem was, it could not be wrapped properly on both subjects at the same time and it was difficult to place a fill light because it would be seen by one camera or the other. We almost always flew a back light way out high on a menace arm as to not be seen by either camera. The back light situation was a bit tough as well because it may look great on one subject from one direction, but it would spill unpleasantly onto the other subject in the opposite direction. We solved this by making the back lights a bit more toppy than I usually make them, in order to avoid spill on opposing subjects. In some cases we were forced to live with not so perfect lighting on both subjects but it was more important to Aaron to have double coverage for editing than to have lighting perfect so it was a sacrifice Jeff and I had to make. I was most proud of a night interior bar set up in which we had to light 5 people that were being double covered from opposing angles (An early version of the setup is ABOVE LEFT).  When finished, we ended up keying with a 44 kino on a menace arm swung way out high over the bar and filled with another low 44 kino under the bar. We also had (2) tweenies on baby off set arms on dimmers for backlights that played as flickering bar TV's. We punched a parcan into the ceiling in the background to raise the ambiance behind the subjects and then we had another tweenie raking across a bunch of glass bottles in the foreground. We did a lot of color temp mixing on each of the fixtures and it looked awesome. I still don't know how we were able to frame out the fixtures for double coverage but somehow we did and it looked pretty good.

          Overall I was happy with the result and I think "A Way Around" has a lot of potential. I'm curious to see how it's shaping up in the edit. We really pulled off something amazing. The locations were gorgeous and it was a small but awesome crew who I plan on working with more and more in the future. I learned a lot in the 18+ days of shooting and I would say my first true dive into DSLR shooting was a success. I came to the conclusion that the 5D is a great low budget option, it just takes a lot of hard work to bring everything within the constraints of it's limited dynamic range. If you have the right tools and the right amount of time to do this, you can make a 5D image look pretty similar to an image from one of the big guns.

Monday, February 20, 2012

Music Video: Jason Mraz "I Won't Give Up


___In January, I gaffed a music video for Jason Mraz called, "I wont Give Up." I worked closely once again with Director/D.P Matt Roe (http://matroe.com/). We have worked together on numerous projects in the past but the stakes were raised a bit on this one as it was our first collaboration under the direction of Mark Pellington (http://www.imdb.com/name/nm0671210/). Mark has directed some amazing projects in the past and I was excited for the chance to finally work with him. We scouted two main locations that would be used for both performance and "story" takes. I use the term "story" loosely because the concept for the video doesn't involve a true narrative element, but rather a combination of powerful images for the viewer to interpret/see/digest/feel. I like this concept a lot because it allows people to watch the video and then develop their own individual interpretation of it based on how the images make them feel.

The first location was a very old house and it's surrounding property. I could tell on the scout that it had a ton of cinematic potential. It featured rusty old furniture, broken down cars, overgrown trees and bushes that twisted into tunnel like semi circles. I knew the location had a ton of history and I felt like I was walking around on egg shells the whole time because I didn't want to disturb any memories that had been created and preserved there for so long. I think I whispered the entire time for that same reason. It's hard to pin point exactly how it made you feel to walk around there, but for me I think it was mostly a feeling of wonder. I wondered about who lived there and the experiences they had. I wondered what their story was. As soon as I saw the people who had been cast and the faces that would be placed in that environment I knew it was going to make for some powerful images. Each face had so such character. I wondered about the people that were cast the same way I wondered about the house and the property.

The shots we got in that location looked amazing and were perfect for the song in my opinion. To me the song is about perseverance. It's about staying strong and fighting for what/who you want or believe in no matter what. I think all of the faces were perfect because you look at them and you can tell that they have been through a lot. You immediately connect the themes of the song to those faces and you start to imagine a story for each of them. They have all undoubtedly been through a lot and they "didn't give up." They are still here and "it was worth it." I also liked the way the little boy and the baby were incorporated into the cut because they bring a sense of time and depth to the piece. It's an amazing contrast to go from the boy's innocent/unsure and exploitative look to the confident/proud weathered look of the older people.


___The second location was a giant rock quarry where we focused on more people/faces and the performance. I think this location worked well because the towering piles of loose gravel rocks and dusty atmosphere reinforced the themes of hard work/persistence and staying strong. One image that made the cut and really sticks out for me in this location is the wide shot of a policemen on top of a gravel pile looking down at a slightly wrinkled American flag. We used an Ageeba (powerful smoke machine) to create billows of smoke that curled up and over the rock piles. (ABOVE LEFT) We also used it in the first location in the early morning and it looked amazing because it gave shape to the rays of sun that were spilling in through the tree branches. (ABOVE RIGHT) We shot the performance takes at the rock quarry with a ton of smoke at sunset which gave the smoke an orange/pink hue that was further enhanced in the color grade.

I learned a lot on this shoot, not from a technical standpoint but more from an emotional one. The fact that I have written this entire post without mentioning a single technical aspect of the shoot on either the camera or lighting/grip side is shocking. Watching Mark and Matt work really opened my eyes to a different kind of shooting. Both of those guys shoot heavily based on instinct and emotion and they like to shoot what feels right immediately. This was a shooting environment unlike any I have ever experienced and although overwhelming at first, it really was amazing. Mark is all about connecting with the actors to get the performances he needs. There were even some takes where he would be operating the camera with one hand while holding the actors hand with the other. That's pretty amazing. Mark doesn't really like lighting and grip equipment (I'm assuming because he feels limited and confined by it) and it definitely clashes with his shooting style. I learned on this shoot that sometimes it's less about making every shot aesthetically pleasing and more about capturing the right emotion. There is definitely a delicate balance there. Matt shared with me a piece of advice Mark gave him once a while back which was, "Shoot more with your heart and less with your head." I'll be remembering that from now on.

Saturday, January 7, 2012

Commercial: "Cliffside Malibu"


___At the end of November I shot a commercial for a drug rehabilitation center called Cliffside Malibu. It was only a one day shoot in which we had to capture 3 interview set ups as well as various b-roll of people interacting on the property. The biggest challenge on this job was getting everything done before sundown, which in late November, was at 4:45 PM. Myself and Director Matt Rowe knew this would be the biggest challenge as we scouted the location the week before. The Clinic was located in the hills of Malibu with a gorgeous view of the surrounding valley and ocean. I could have shot there for 3 days and not covered everything I wanted to on the property. Matt and I broke down the coverage based on the clients boards and scheduled the set ups in a way that made the most sense based on the position of the sun throughout the day. I also made a detailed list of the lighting fixtures and grip equipment that would be used on each set up so that the G&E guys could be one step ahead of Matt and myself at all times. We knew this was the only way we had any shot of getting everything in the can before sundown.

We shot on two Sony F3's with RED Zooms. During the interview setups, our A Camera was always on sticks while our B Camera floated off key side on a slider. For the interior interview setup we keyed with a book light (1.2 HMI into a bounce board back through a 6x6 frame of light grid with siders). For a back-light we used a 22 Kino on a menace arm. On the fill side we just flew in a bounce board to get some return from the key. The key was relatively frontal anyway as the client was looking for a soft, even feel for the whole piece. We also used a Joleko to put a slash and or window pattern on various background elements. We then covered various windows and doors with double net to take the natural sunlight down a stop outside and gain a bit more detail back in the windows. We were really testing the dynamic range on the F3's all day, which was something I was concerned about because I knew from the scout that we would be dealing with areas of extremely high contrast. NDing the windows would have helped us a lot but we just didn't have the time or personnel to make that happen efficiently enough with our schedule.

For the b-roll shots of people interacting on the property and surrounding landscape our A Camera was almost always on a jib while our b-camera was on a slider. It was important to us that the camera always be in motion to add the the pieces relaxed, serene feel. For exteriors that were not extremely wide, we were able to sneak in a mirror board through a 4x4 frame of 250 to add an edge or to fill in faces here and there. We also used a 12x12 frame of 1/2 soft frost to knock down the harsh sunlight on some tighter exteriors. By the end of the day, we were so pressed for time that Matt and I broke off into two separate units to take full advantage of golden hour. Overall it was a great shoot and the final spots are looking good.

Monday, November 28, 2011

Short: "Cheat Day"


___In the middle of November I worked as a Gaffer on a short called "Cheat Day." Friend and fellow D.P Jess Dunlap was shooting and asked me to come on board as Gaffer. We were shooting on the RED MX and working with a small G&E package but it was enough to get the job done. For the interiors we keyed through a big window with a 1.2 HMI through a 8x8 light grid with a 4x4 250 in between the fixture and the big frame to soften the light even more. We filled with either 44 kinos or 24 kinos through 4x4 frames of 250 or opal. We also used a joleko bounced into a small bounce card a lot to create subtle back edges or even provide fill in small hallway areas where it was impossible to squeeze a fixture in.

We had one pretty big exterior setup that consisted of a model walking down a red carpet up to the front steps of the house. We bounced a 1.2 HMI into a big bounce board off camera left for general ambiance/key. We then set up four Lekos. Two played in frame as part of the red carpet scene while two others were just off camera creating two edge lights, one on each side of the models hair. We then positioned the Joleko off camera right and had an electric pan the light back and forth to flare the lens during the shot. We shot it at 120 FPS while dollying through the doorway towards the model and red carpet outside. Playback looked pretty awesome with the flares and smoke.

One SFX shot included mounting the RED to a remote head so that a motion controlled 360 degree pan of a bedroom could be captured. We lit the room by placing two frames of 250 tight to the two windows outside the room and shot an 800w Joker through one and two 44 kinos through another. We couldn't really put any other fixtures inside the room because everything was seen in the 360 degree pan. I didn't get a chance to see playback on this shot but I'm interested to see how it came out. Overall it was a good shoot with good people. Jess was one of the only people I knew on set but it was cool to work with some new faces. Hopefully we will continue to work together in the future.

Sunday, November 13, 2011

Short: "Rays Of Darkness"


___In the middle of October I shot a short called "Rays of Darkness." I was pretty excited to be hired to D.P this job because I knew the director was looking for a dramatic low key look and that it would be fun to light. We shot on the RED with a set of CP2 lenses. I rated the camera at 320 ISO most of the shoot but there were a few scenes that I pushed it to 640. I was concerned about doing so at first but looking at the dailies after the fact I actually like the slight graininess of the scenes shot at 640 better than the footage that was shot at 320. It definitely adds a grittiness that fits well with the look of the piece. We used our 1 Ton lighting/grip package on this gig as well. This was the first shoot I've D.P'd that consisted of sets as opposed to practical locations. It was definitely challenging because obviously every light had to be placed and created without looking fake or unnatural. It was a lot different than working in a practical location where you would be augmenting and or adding to the existing light. It was fun in the fact that it was like starting with a blank pallet every shot but it was challenging because it was tough to make each light feel and look natural.

One of the lighting set ups that I was most proud of was in a "morgue" set complete with real body slabs. (TOP LEFT) Gaffer John Hafner and Key Grip Jeff Marlowe were able to have a decent amount of time to pre-light and it definitely payed off. They did a great job. We had spoken about the morgue set earlier and that I wanted it to have a green feel off in the background but I wanted the key to feel a bit more neutral. The mix in color temperatures really looked great, the green background with a slightly more neutral key and fill. We ended up gelling the recessed practical lights with green gels to light the background and then a 750w par was rigged to the ceiling pointing straight down bouncing into a silver operating table. This provided a key for the actors in the middle ground as they stood around the table. The par created a really cool hot spot on the silver table that was motivated by a crazy circular"operating lamp" visible in the frame. The "operating lamp" also provided a nice back light for the actors on the right side of frame. We then added a big CFL softbox to help raise the light level in the foreground as well as add some fill to the actors in the middle ground. The only other small tweaks we made were adding another floor practical lamp to the background to balance out the frame on the left side and then flew in a 1x1 light panel to key the actress as she moved closer to the foreground later on in the scene. We added some haze to the scene as well which looked great.

1st A.C Austin Ahlborg did a great job all around as well. There were a lot of hand-held scenes in the short and they were definitely challenging to pull. It was really one of those deals where I just had to feel out the scene and go with the flow as I was operating and he just adapted well on the fly. I learned quick that the RED fully decked out with two on board monitors, hard drive, brick, matte-box etc. was not easy to shoulder for long periods of time but It it all worked out. We shot about 12 pages in two days. It was stressful at times and we were rushed at points but I think all things considered the footage looks great.

Friday, September 9, 2011

Feature: "Love's Christmas Journey"


___At the end of August I worked as an assistant camera on a feature for the Hallmark channel called, "Love's Christmas Journey." It will be a total of a 40-day shoot that will make up a two part mini-series set to air around Christmas. This was a really cool shoot to work on for a ton of reasons; one being that it was my first Western. We started shooting at Melody Ranch which had a huge exterior western set complete with sheriff’s office, general store, saloon and more. We were shooting on 2 "Panavised" RED MX's, which was awesome. (ABOVE RIGHT) Panavision buys RED bodies and modifies them so they can be outfitted completely with Panavision accessories. The standard PL mount is removed from the RED body and a special mount is attached to fit the Panavision PRIMO ZOOMS that are used on both cameras. Panavision also developed a power box that bypasses RED's power system and allows the camera to be powered off two sources simultaneously. On set, the cameras are powered off a set of Dionic batteries, which mount to the top rail system, as well as a big lead Panavision block battery. The camera runs off block battery power while we are on sticks shooting, and then when we have to move the camera to a different set up, we switch to the Dionic power source. It's a really great system that is quick and easy and it allows us to run the camera constantly on set without powering down. The “panavised” RED’s also feature a side rail system for the swing away matte box, Panavision’s microforce zoom control and a bunch of other sweet Panavision accessories.


Over the course of the 7 days I was on the project, we shot some really awesome stuff including a small fight scene and a scene in which a barn goes up in flames. (LEFT) The D.P, Maximo Munzi, uplit a lot of the scenes in the film using “covered wagons.” They were pretty simple home made lights made up of 6 practicals on a 2x4 with chicken wire and light grid wrapped around the globes in a semi-circle. He placed them on the ground and used them as fill and even key at times. Mostly all of the smaller tungsten sources as well as any HMI lights that flew were outfitted with soft boxes and grids or shot through 4x4 frames of diff. He rarely ever used a hard source. For night exteriors we had a condor with two Maxibrutes shooting through 4x4 frames of opal or other diffusion. This was used mostly as a moonlight ambient source. He used 4x4 frames of double net to control light coming from broad sources at times, which was pretty cool. For day exteriors he used some powerful HMI’s as fill or table topped a 12x12 rag of ¼ silk or similar to soften the harsh overhead sunlight. He also used an ultra-bounce a lot as well. Overall it was a great shoot with a fun crew. I hope to continue working for Hallmark as I really like everyone in the camera and G/E department. I learned a lot about Panavision accessories and it was nice to work with some higher end camera equipment.

Wednesday, August 24, 2011

Commercial: "LA Weightloss"


___In the middle of August I worked as a swing grip/electric on a commercial shoot for LA Weightloss. We were working off of the 5 ton truck at this amazing house in Malibu high in the hills. It was a pretty small crew but we still got some great looking shots. One of the setups was in a bathroom that had two big windows that looked out into the canyon below. The D.P wanted to retain the detail outside in order to see the canyon so he stopped down a lot. This meant we had to blast the bathroom with light in order to get the exposure inside close to the same stop as the exposure outside. We blasted two 1.2 HMI's through a 4x4 frame of 250 for a key, then bounced a 2k mighty into the ceiling to raise the ambient level. We floated a 2 foot 2 bank Kino around for fill as well. We also used various Lekos as specials to accent certain background elements like cabinets or the bathtub. We used a mirror board outside and reflected it in through a window off screen to up the light level in the background as well. It was really tough to raise the light level inside the bathroom to match the light level outside in the canyon but in the end the image looked great despite the insane amount light we had to pump into such a small space.

A couple other setups were in the kitchen in which giant sliding glass doors were visible in the background of the shot. The D.P wanted to once again retain the detail outside in order to see the infinity pool, canyon and ocean backdrop. Instead of trying to blast the whole kitchen with light, we spent a lot of time cutting rolls of ND6 and carefully taping them over all the sliding glass doors. This brought the outside light level down two stops so it was a lot easier to match that light level in the kitchen. We used a 1.2 HMI through a 4x4 frame of 250 for key and two Image 80's for fill and ambient. The image 80's are nice lights for pretty pieces because they are a big soft source and really fill in shadows nicely. The last few setups of the day were outside in the pool. We used mirror boards through 4x4 frames of 250 and opal as key and an 8x8 ultrabounce for fill. We also used mirror boards to accent certain spots in the water behind the talent. Overall it was a solid day and because it was a small crew I had a lot more responsibility in terms of gear. I'm really getting to know this 5 ton truck and am starting to feel comfortable with all the equipment and how it is stored. A couple more gigs on this truck and I'll be even more confident with all the gear.

Monday, August 22, 2011

Commercial: "Eleven Skin"


___At the beginning of August I worked as a swing grip/electric on a commercial shoot for the skin care product "Eleven Skin." We were working off a 5 ton truck plus another 30 fixture add on order from Acey Decy lighting. We had an entire day to pre-light for the shoot so it was a pretty relaxed environment as there was no serious rush to roll. We were shooting on a giant stage stage in which we had to light about 270 degrees worth of set. The set consisted of a circular step up stage in the middle where 4 chairs were positioned for the talent to sit around and discuss the amazing product at length. The background of the set was built to look like the outside of a house, complete with giant doors and a ton of windows. I would say when all was said and done we hung about 50-60 fixtures in that place. Most of the lights that played was hanging from the massive grid above the stage. We started by hanging nine 6K Barger lights in a circle around the circular stage in order to bath the talent in soft light. We then used a serious of Lekos to accent anything the D.P wanted to draw attention to in the background. We put them high up in the grid and tilted them down at steep angles to throw hard beams of light on different cabinets or other elements of the stage. Lekos are really awesome lights because they are super controllable as you can cut the beam from any angle with the blades as well as focus or defocus the beam by pushing the lens further or closer to the globe. You can also switch out the lens for a narrow or wider beam. (we used a combination of 19, 25 & 40 degree) It was a lot of work to hang each fixture but it was fun because I got to learn to drive a scissor lift.


Once we hung all the lights from the grid, we accented other items of the set by hiding single Kino bulbs behind them. We hid two bulbs on the side of a staircase so that the stairs looked like they were illuminated, as well as a few other bulbs behind display cases to draw attention to the products in them. To give life to the background set, we covered each window and door with 1000H (tracing paper) and then bounced a combination of 5K's and 2K's off the white wall behind the set back through the 1000H. This gave a soft glow to each window and door as if the sun were shinning through. We finished off with various accents from a few tweenies and Lekos on baby plates positioned on the floor off set. It was amazing to look at all the lights that we put up at the end of the day. I checked out the generator and we were running just over 1000 amps. That's definitely the most power I've pulled on any set since I've been in L.A. I like being a swing Grip/Electric because I can learn both the grip and electric side of things. I'm pretty set with most of the grip stuff, so I tried to hang with the electrics on this set. I learned a lot about 3 phase and also about SACO cable, which I had never worked with before. It's a giant cable that splits off into about 8 Edison plugs at the end. This cable was really useful because we could hang it in the grid and run a ton of lights off of one main cable. Overall, it was a great shoot and I learned a lot about both the grip and electric side of things. I've worked off the same 5 ton truck a bunch of times now and I am really getting to know the ins and outs of all the gear and where it all belongs on the truck. Hopefully I'll continue to work with the same crew as they are all great guys.